Setting up Wireguard server on EC2

Let’s explore what network access patterns can be established with Wireguard VPN setup. We will deep dive into the installation process, configuration, generation of client keys and troubleshooting the connection.
What is VPN, why WireGuard?
VPN technology creates an encrypted tunnel between devices or networks, protecting traffic from interception while providing secure access to private resources over untrusted networks.
WireGuard is a modern VPN protocol designed around simplicity, strong cryptography, and high performance, with a much smaller codebase than traditional VPN solutions.
Its fast connection setup, low overhead, and straightforward configuration make it well suited for cloud, mobile, and remote-access VPN deployments.
Compared to OpenVPN, wireguard consumes less server resources and can run on low memory, cpu limited machine. In this setup we will utilize 1 single core ARM machine with 512MB of RAM.
With such installation, it performs well does not drop traffic (verified on 700MB/sec speed).
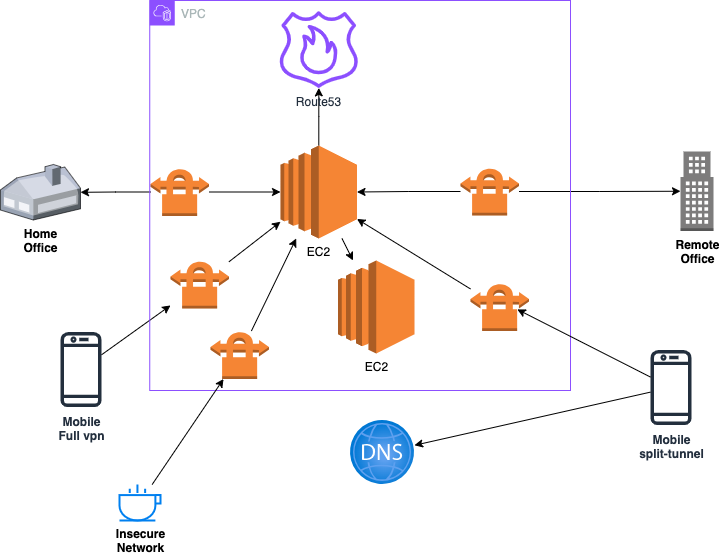
Network Access patterns that can be established with wireguard VPN
- Access to isolated network - such endpoint is entry point to your VPC.
- VPC server-mode with forwarding all traffic over encrypted WireGuard VPN tunnel.
- VPN split-tunneling, when all internat and intranet traffic is used via direct interfaces, but only some subnets are accessed through wireguard interface.
- Muli-sites and multi-clinet connections - same way you can connect different servers, routers, devices to single Wireguard VPN, each of them will get the CIDR from the same network allowing them communicate with each other. Companies are using such topologie to connect together remote offices, datacenters, and cloud services.
- Remote access to private assets - home server infrastructure, office servers, and other private resources can be accessed securely and privately through a WireGuard VPN.
- Establishing encrypted connection from insecure public networks (public wifi, coffee shops, etc.).
Infrastructure:
Preparing EC2 instance for installation
Wireguard server consumes very low resources, I have setup it on instance with ARM cpu and 500MB of RAM. It runs perfectly - there are no freezes, with speed test under load of UDP stream and file transfer CPU load has not increased more then 20%, so probably if there will be smaller instance type it will be enough to setup and run.
1
2
chmod 400 "remote-key.pem"
ssh -i "remote-key.pem" ubuntu@ec2-xx-xx-xx-xx.xx-xxx-1.compute.amazonaws.com
Adding Swap volume
But since I have choosen only 500MB of RAM instance, just to assure I’m adding a 2G swap. Thus if with some spike memory will increase beyond of physical RAM - instance will not be terminated cause SWAP will be used.
1
2
3
4
5
sudo fallocate -l 2G /swapfile
sudo chmod 600 /swapfile
sudo mkswap /swapfile
sudo swapon /swapfile
echo "/swapfile swap swap defaults 0 0" | sudo tee -a /etc/fstab
Update OS:
1
apt update && apt upgrade -y
wireguard installation:
1
apt install -y wireguard
generate server keys
1
wg genkey | sudo tee /etc/wireguard/privatekey | wg pubkey | sudo tee /etc/wireguard/publickey
Set proper privatekey permissions
1
chmod 600 /etc/wireguard/privatekey
Check available network interfaces
1
2
3
4
5
6
7
8
9
10
11
12
13
14
15
ip a
1: lo: <LOOPBACK,UP,LOWER_UP> mtu 65536 qdisc noqueue state UNKNOWN group default qlen 1000
    link/loopback 00:00:00:00:00:00 brd 00:00:00:00:00:00
    inet 127.0.0.1/8 scope host lo
       valid_lft forever preferred_lft forever
    inet6 ::1/128 scope host noprefixroute
       valid_lft forever preferred_lft forever
2: ens5: <BROADCAST,MULTICAST,UP,LOWER_UP> mtu 9001 qdisc mq state UP group default qlen 1000
    link/ether 0a:xx:xx:a6:xx:9b brd ff:ff:ff:ff:ff:ff
    altname enp0s5
    altname enx0affe1a6ff9b
    inet 172.31.5.70/20 metric 100 brd 172.31.15.255 scope global dynamic ens5
       valid_lft 3258sec preferred_lft 3258sec
    inet6 fe80::8ff:xxxx:fea6:ff9b/64 scope link proto kernel_ll
       valid_lft forever preferred_lft forever
In case interface name can be different eth0, can be other ens3 etc. This interface alias we will use in /etc/wireguard/wg0.conf:
1
sudo nano /etc/wireguard/wg0.conf
You can modify the port number, network CIDR:
1
2
3
4
5
6
[Interface]
PrivateKey = <privatekey>
Address = 10.0.0.1/24
ListenPort = 51830
PostUp = iptables -A FORWARD -i %i -j ACCEPT; iptables -t nat -A POSTROUTING -o ens5 -j MASQUERADE
PostDown = iptables -D FORWARD -i %i -j ACCEPT; iptables -t nat -D POSTROUTING -o ens5 -j MASQUERADE
1
<privatekey> from /etc/wireguard/privatekey
IP forwarding configuration:
1
2
3
4
5
6
7
echo "net.ipv4.ip_forward = 1" | sudo tee -a /etc/sysctl.conf
sudo sysctl -p

$ echo "net.ipv4.ip_forward = 1" | sudo tee -a /etc/sysctl.conf
net.ipv4.ip_forward = 1
ubuntu@ip-xx-xx-xx-xx:~$ sudo sysctl -p
net.ipv4.ip_forward = 1
Enable systemd daemon with wireguard:
1
2
3
sudo systemctl enable wg-quick@wg0
sudo systemctl start wg-quick@wg0
sudo systemctl status wg-quick@wg0
Add clients, register client keys on the server:
Prepare keys for clients connections:
1
wg genkey | sudo tee /etc/wireguard/client1_privatekey | wg pubkey | sudo tee /etc/wireguard/client1_publickey
Update server config with newly generated clients:
1
sudo nano vim /etc/wireguard/wg0.conf
Add following blocks to end of config
1
2
3
4
5
6
7
8
9
10
11
[Peer]
PublicKey = <client1_public_key>
AllowedIPs = 10.0.0.2/32

[Peer]
PublicKey = <client2_public_key>
AllowedIPs = 10.0.0.3/32

[Peer]
PublicKey = <client3_public_key>
AllowedIPs = 10.0.0.4/32
Change
Restart systemd service with wireguard:
1
2
sudo systemctl restart wg-quick@wg0
sudo systemctl status wg-quick@wg0
Client connection setup:
On local machine (laptop, phone) create .conf file for client:
1
nano client_wb.conf
1
2
3
4
5
6
7
8
9
10
[Interface]
PrivateKey = <client_private_key>
Address = 10.0.0.2/32
DNS = 8.8.8.8

[Peer]
PublicKey = server_public_key
Endpoint = <server_ip>:<server_port>
AllowedIPs = 0.0.0.0/0
PersistentKeepalive = 20
1
2
PublicKey is from `/etc/wireguard/publickey``
PrivateKey is from ``/etc/wireguard/client1_privatekey``
Import this configuration file to Wireguard client and click connecting.
Activate security group
At this moment you will see on client side that connection is ongoing and there are sent bytes, however there are zero received bytes. To make server work we need enable Security Group for wireguard port:
port: 51280 protocol: UDP
Check connection after SG has been applied:
1
2
3
4
5
6
7
8
9
10
11
sudo wg show
interface: wg0
  public key: xxxxxxxxxx=
  private key: (hidden)
  listening port: 51820

peer: xxxx=
  endpoint: 178.xx.42.xx:47868
  allowed ips: 10.0.0.2/32
  latest handshake: 11 seconds ago
  transfer: 175.35 MiB received, 718.21 MiB sent
We got a handshake and traffic is going.
Routing specific traffic
When setting up VPN tunnel, you can route specific traffic through the VPN. It support 2 modes:
- full tunnel
- split tunnel
This is useful when you want to encrypt and secure only certain applications or services, while leaving others unaffected.
For example, you can route all traffic from a specific application through the VPN, ensuring that only that application’s traffic is encrypted and protected.
Full Tunnel: Set AllowedIPs = 0.0.0.0/0 on the client configuration to route all traffic (including all encapsulated UDP packets) through the VPN.
Split Tunnel: Set AllowedIPs to a specific subnet (e.g., 10.0.0.0/24) so only traffic destined for that remote network uses the WireGuard interface.
Routing DNS traffic
Also, when configuring WireGuard, you can route DNS traffic through the VPN. This is useful when you want to ensure that all DNS queries are encrypted and protected. To do this, you can set the DNS server address in the client configuration to the IP address of the DNS server on the VPN network.
DNS = WIREGUARD_SERVER_IP
or keep to downstrem DNS, like:
DNS = 8.8.8.8
For more complex traffic routing other VPN and proxy solutions should be used, that allow distinguish protocols, ports, geo-zones, traffic snippets, that I will share soon.