Securely accessing ECS Fargate containers shell, without SSH or exposed ports

Abstract
Very often as a SysOps or Developer we need login into running container in ECS cluster for troubleshooting or verification. To have such possibilities some companies are exposing 22 port for SSH session. But such actions expose the container for external atacks. In this post we will check ecs exec feature that allows to access container runtime without exposing ssh ports or even for containers that do not have public network endpoints.
It provides an interactive shell to troubleshoot or debug issues within your containers running in an ECS cluster. The ecs exec command is a part of the ECS CLI (Command Line Interface) and facilitates this functionality.
ECS Exec simplifies the process of debugging and troubleshooting applications running in ECS containers by providing a direct and secure way to interact with the containers without the need for SSH access to the underlying EC2 instances or having Jump Box.
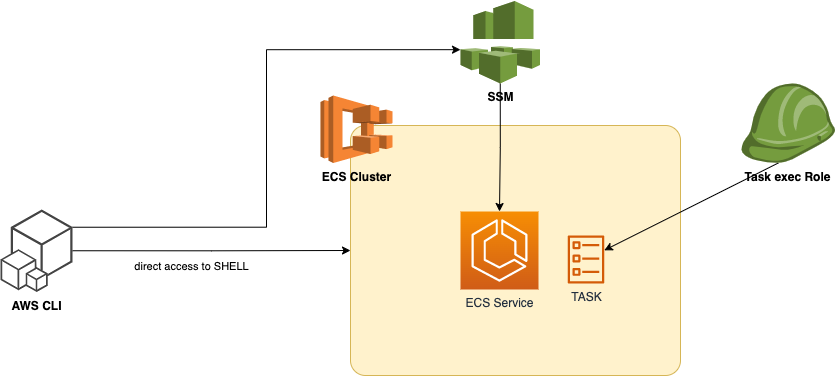
Target Infrastructure
Prepare client machine, by installing Session Manager
1
2
3
4
5
6
7
8
9
10
11
12
13
14
15
16
17
18
19
20
21
22
23
24
> curl "https://s3.amazonaws.com/session-manager-downloads/plugin/latest/mac/sessionmanager-bundle.zip" -o "sessionmanager-bundle.zip"
  % Total    % Received % Xferd  Average Speed   Time    Time     Time  Current
                                 Dload  Upload   Total   Spent    Left  Speed
100 3761k  100 3761k    0     0  2229k      0  0:00:01  0:00:01 --:--:-- 2247k

> unzip sessionmanager-bundle.zip
Archive:  sessionmanager-bundle.zip
   creating: sessionmanager-bundle/
  inflating: sessionmanager-bundle/seelog.xml.template
  inflating: sessionmanager-bundle/THIRD-PARTY
  inflating: sessionmanager-bundle/LICENSE
  inflating: sessionmanager-bundle/RELEASENOTES.md
  inflating: sessionmanager-bundle/NOTICE
  inflating: sessionmanager-bundle/install
   creating: sessionmanager-bundle/bin/
  inflating: sessionmanager-bundle/bin/session-manager-plugin
  inflating: sessionmanager-bundle/README.md
 extracting: sessionmanager-bundle/VERSION

> sudo ./sessionmanager-bundle/install -i /usr/local/sessionmanagerplugin -b /usr/local/bin/session-manager-plugin

> session-manager-plugin

The Session Manager plugin was installed successfully. Use the AWS CLI to start a session.
Enable execute command for service
First, we need update container configuration by enabling --enable-execute-command (this can be done in IaC or through cli) following details required:
| params | value |
|---|---|
| cluster | prod-fargate-cluster |
| service | prod-fg-svc |
1
> aws ecs update-service --cluster prod-fargate-cluster --enable-execute-command --service prod-fg-svc --force-new-deployment
Connect to ECS task
| params | value |
|---|---|
| cluster | prod-fargate-cluster |
| service | app-container |
1
2
3
4
> aws ecs execute-command --cluster prod-fargate-cluster --task 6ebc693821521f131d --container app-container --interactive --command "/bin/bash"

The Session Manager plugin was installed successfully. Use the AWS CLI to start a session.
An error occurred (TargetNotConnectedException) when calling the ExecuteCommand operation: The execute command failed due to an internal error. Try again later.
This error shows that IAM Role attached to container does not contain proper permissions to establish communication channel for SSH We need to create the following policy and attach it to Container exec Role:
1
2
3
4
5
6
7
8
9
10
11
12
13
14
15
{
  "Version": "2012-10-17",
  "Statement": [
    {
      "Effect": "Allow",
      "Action": [
        "ssmmessages:CreateControlChannel",
        "ssmmessages:CreateDataChannel",
        "ssmmessages:OpenControlChannel",
        "ssmmessages:OpenDataChannel"
      ],
      "Resource": "*"
    }
  ]
}
Once role is setup, connect again:
1
2
3
4
> aws ecs execute-command --cluster prod-fargate-cluster --task 6ebc693821521f131d --container app-container --interactive --command "/bin/bash"
The Session Manager plugin was installed successfully. Use the AWS CLI to start a session.
Starting session with SessionId: ecs-execute-command-0f350d07e044f81b4
bash-5.0#
We are in container shell now:
Be careful - because now you are the root:
1
2
# whoami
root
When a user runs commands on a container using ECS Exec, these commands are run as the root user. The SSM agent and its child processes run as root even when you specify a user ID for the container.
Interesting that AWS Fargate uses 2 COREs of Intel(R) Xeon(R) Platinum 8259CL CPU @ 2.50GHz CPU attached to task:
1
2
3
4
5
6
7
8
9
10
11
12
13
14
15
16
17
18
19
20
21
22
23
24
25
26
27
28
29
30
31
32
33
34
35
36
37
38
39
40
41
42
43
44
45
46
47
48
49
50
51
52
53
54
cat /proc/cpuinfo
processor	: 0
vendor_id	: GenuineIntel
cpu family	: 6
model		: 85
model name	: Intel(R) Xeon(R) Platinum 8259CL CPU @ 2.50GHz
stepping	: 7
microcode	: 0x5003605
cpu MHz		: 2500.004
cache size	: 36608 KB
physical id	: 0
siblings	: 2
core id		: 0
cpu cores	: 1
apicid		: 0
initial apicid	: 0
fpu		: yes
fpu_exception	: yes
cpuid level	: 13
wp		: yes
flags		: fpu vme de pse tsc msr pae mce cx8 apic sep mtrr pge mca cmov pat pse36 clflush mmx fxsr sse sse2 ss ht syscall nx pdpe1gb rdtscp lm constant_tsc rep_good nopl xtopology nonstop_tsc cpuid tsc_known_freq pni pclmulqdq ssse3 fma cx16 pcid sse4_1 sse4_2 x2apic movbe popcnt tsc_deadline_timer aes xsave avx f16c rdrand hypervisor lahf_lm abm 3dnowprefetch invpcid_single pti fsgsbase tsc_adjust bmi1 avx2 smep bmi2 erms invpcid mpx avx512f avx512dq rdseed adx smap clflushopt clwb avx512cd avx512bw avx512vl xsaveopt xsavec xgetbv1 xsaves ida arat pku ospke
bugs		: cpu_meltdown spectre_v1 spectre_v2 spec_store_bypass l1tf mds swapgs itlb_multihit mmio_stale_data retbleed gds
bogomips	: 5000.00
clflush size	: 64
cache_alignment	: 64
address sizes	: 46 bits physical, 48 bits virtual
power management:

processor	: 1
vendor_id	: GenuineIntel
cpu family	: 6
model		: 85
model name	: Intel(R) Xeon(R) Platinum 8259CL CPU @ 2.50GHz
stepping	: 7
microcode	: 0x5003605
cpu MHz		: 2500.004
cache size	: 36608 KB
physical id	: 0
siblings	: 2
core id		: 0
cpu cores	: 1
apicid		: 1
initial apicid	: 1
fpu		: yes
fpu_exception	: yes
cpuid level	: 13
wp		: yes
flags		: fpu vme de pse tsc msr pae mce cx8 apic sep mtrr pge mca cmov pat pse36 clflush mmx fxsr sse sse2 ss ht syscall nx pdpe1gb rdtscp lm constant_tsc rep_good nopl xtopology nonstop_tsc cpuid tsc_known_freq pni pclmulqdq ssse3 fma cx16 pcid sse4_1 sse4_2 x2apic movbe popcnt tsc_deadline_timer aes xsave avx f16c rdrand hypervisor lahf_lm abm 3dnowprefetch invpcid_single pti fsgsbase tsc_adjust bmi1 avx2 smep bmi2 erms invpcid mpx avx512f avx512dq rdseed adx smap clflushopt clwb avx512cd avx512bw avx512vl xsaveopt xsavec xgetbv1 xsaves ida arat pku ospke
bugs		: cpu_meltdown spectre_v1 spectre_v2 spec_store_bypass l1tf mds swapgs itlb_multihit mmio_stale_data retbleed gds
bogomips	: 5000.00
clflush size	: 64
cache_alignment	: 64
address sizes	: 46 bits physical, 48 bits virtual
power management:
Check the memory and SWAP usage:
1
2
3
4
free
              total        used        free      shared  buff/cache   available
Mem:         950088      405392       72064         468      472632      457088
Swap:             0           0           0
Here is the mounting point of container. By default Fargate uses 20GB volume for free without billing - looks like that it uses nvme for it, attaching /dev/nvme1n1:
1
2
3
4
5
6
7
8
9
10
11
12
13
14
15
16
17
bash-5.0# df -h
Filesystem                Size      Used Available Use% Mounted on
overlay                  29.4G      9.9G     17.9G  36% /
tmpfs                    64.0M         0     64.0M   0% /dev
shm                     463.9M         0    463.9M   0% /dev/shm
tmpfs                   463.9M         0    463.9M   0% /sys/fs/cgroup
/dev/nvme1n1             29.4G      9.9G     17.9G  36% /etc/hosts
/dev/nvme1n1             29.4G      9.9G     17.9G  36% /etc/resolv.conf
/dev/nvme1n1             29.4G      9.9G     17.9G  36% /etc/hostname
/dev/nvme0n1p1            4.8G      1.9G      2.8G  41% /managed-agents/execute-command
tmpfs                   463.9M         0    463.9M   0% /proc/acpi
tmpfs                    64.0M         0     64.0M   0% /proc/kcore
tmpfs                    64.0M         0     64.0M   0% /proc/keys
tmpfs                    64.0M         0     64.0M   0% /proc/latency_stats
tmpfs                    64.0M         0     64.0M   0% /proc/timer_list
tmpfs                    64.0M         0     64.0M   0% /proc/sched_debug
tmpfs                   463.9M         0    463.9M   0% /sys/firmware
Also interesting observation is /dev/nvme0n1p1 mounted to /managed-agents/execute-command - this is the agent that established secure connection we are using right now.
Keep note that there is a small overhead 2% of CPU consumption when ssm-session is active (to maintain channel connection and expose shell) - it is relatively small compared to the benefits.
1
2
3
4
5
6
7
8
9
10
11
12
13
14
15
# top
Mem: 749224K used, 194304K free, 420K shrd, 26588K buff, 274588K cached
CPU:   0% usr   0% sys   0% nic  98% idle   0% io   0% irq   0% sirq
Load average: 0.04 0.01 0.00 3/321 10327
  PID  PPID USER     STAT   VSZ %VSZ CPU %CPU COMMAND
10317    46 root     S    1228m 133%   1   0% /managed-agents/execute-command/ssm-session-worker ecs-execute-command-0c08a0b0a74e088bb
   46    15 root     S    1530m 166%   0   0% /managed-agents/execute-command/ssm-agent-worker
10145    46 root     S    1302m 141%   1   0% /managed-agents/execute-command/ssm-session-worker ecs-execute-command-00b61e27773ca1bbc
   15     0 root     S    1298m 141%   0   0% /managed-agents/execute-command/amazon-ssm-agent
    1     0 node-red S     318m  35%   0   0% node /opt/yarn-v1.22.19/bin/yarn.js start
  114     1 node-red S     318m  35%   1   0% node /opt/yarn-v1.22.19/bin/yarn.js run file-watcher
10154 10145 root     S     2944   0%   0   0% /bin/bash
10326 10317 root     S     2944   0%   0   0% /bin/bash
10327 10326 root     R     1708   0%   0   0% top
 8285     1 root     Z        0   0%   1   0% [python]
ECS Exec will use some CPU and memory. You’ll want to accommodate for that when specifying the CPU and memory resource allocations in your task definition.
1
2
3
4
5
6
7
8
9
# ls -la /managed-agents/execute-command/
total 52808
drwx------    4 root     root          4096 Feb  3 22:17 .
drwxr-xr-x    3 root     root          4096 Feb  3 22:17 ..
-r-x--x--x    1 root     root      14008128 Feb  3 22:17 amazon-ssm-agent
drwx------    2 root     root          4096 Feb  3 22:17 certs
drwx------    2 root     root          4096 Feb  3 22:17 configuration
-r-x--x--x    1 root     root      22925408 Feb  3 22:17 ssm-agent-worker
-r-x--x--x    1 root     root      17120000 Feb  3 22:17 ssm-session-worker
So ssm-agent configuration with certs and executables is provisioned and attached as mounting point once we enable exec access.
ECS Exec makes use of AWS Systems Manager (SSM) Session Manager to establish a connection with the running container and uses AWS Identity and Access Management (IAM) policies to control access to running commands in a running container. This is made possible by bind-mounting the necessary SSM agent binaries into the container. The Amazon ECS or AWS Fargate agent is responsible for starting the SSM core agent inside the container alongside your application code.
Same way we can inspect network configuration:
1
2
3
4
5
6
7
8
9
10
11
12
13
14
15
16
17
18
19
20
21
22
23
24
25
26
27
ifconfig
eth0      Link encap:Ethernet  HWaddr xx:xx:xx:xx:xx:xx
          inet addr:169.254.172.2  Bcast:0.0.0.0  Mask:255.255.252.0
          inet6 addr: fe80::fe80:fe80:fe80:cd26/64 Scope:Link
          UP BROADCAST RUNNING MULTICAST  MTU:1500  Metric:1
          RX packets:75 errors:0 dropped:0 overruns:0 frame:0
          TX packets:68 errors:0 dropped:0 overruns:0 carrier:0
          collisions:0 txqueuelen:0
          RX bytes:29991 (29.2 KiB)  TX bytes:6990 (6.8 KiB)

eth1      Link encap:Ethernet  HWaddr xx:xx:xx:xx:xx:xx
          inet addr:10.0.2.11  Bcast:0.0.0.0  Mask:255.255.255.0
          inet6 addr: fe80::fe80:fe80:fe80:f21b/64 Scope:Link
          UP BROADCAST RUNNING MULTICAST  MTU:9001  Metric:1
          RX packets:97705 errors:0 dropped:0 overruns:0 frame:0
          TX packets:22986 errors:0 dropped:0 overruns:0 carrier:0
          collisions:0 txqueuelen:1000
          RX bytes:120145440 (114.5 MiB)  TX bytes:4789383 (4.5 MiB)

lo        Link encap:Local Loopback
          inet addr:127.0.0.1  Mask:255.0.0.0
          inet6 addr: ::1/128 Scope:Host
          UP LOOPBACK RUNNING  MTU:65536  Metric:1
          RX packets:0 errors:0 dropped:0 overruns:0 frame:0
          TX packets:0 errors:0 dropped:0 overruns:0 carrier:0
          collisions:0 txqueuelen:1000
          RX bytes:0 (0.0 B)  TX bytes:0 (0.0 B)
Even install more utils if needed
1
2
3
4
5
6
7
8
9
10
11
12
13
14
15
# apk add mc
(1/11) Installing libcom_err (1.47.0-r2)
(2/11) Installing e2fsprogs-libs (1.47.0-r2)
(3/11) Installing libintl (0.21.1-r7)
(4/11) Installing libblkid (2.38.1-r8)
(5/11) Installing libmount (2.38.1-r8)
(6/11) Installing glib (2.76.4-r0)
(7/11) Installing gpm-libs (1.20.7-r3)
(8/11) Installing pcre (8.45-r3)
(9/11) Installing slang (2.3.3-r1)
(10/11) Installing libssh2 (1.11.0-r0)
(11/11) Installing mc (4.8.29-r2)
Executing busybox-1.36.1-r2.trigger
Executing glib-2.76.4-r0.trigger
OK: 98 MiB in 74 packages
Conclusions
Amazon ECS Exec is a powerful tool, crucial to have in toolset of support and development for any product. By poviding access to container shell without exposing any port outside, working though session of aws-based agent it is an extra secure instrument.